
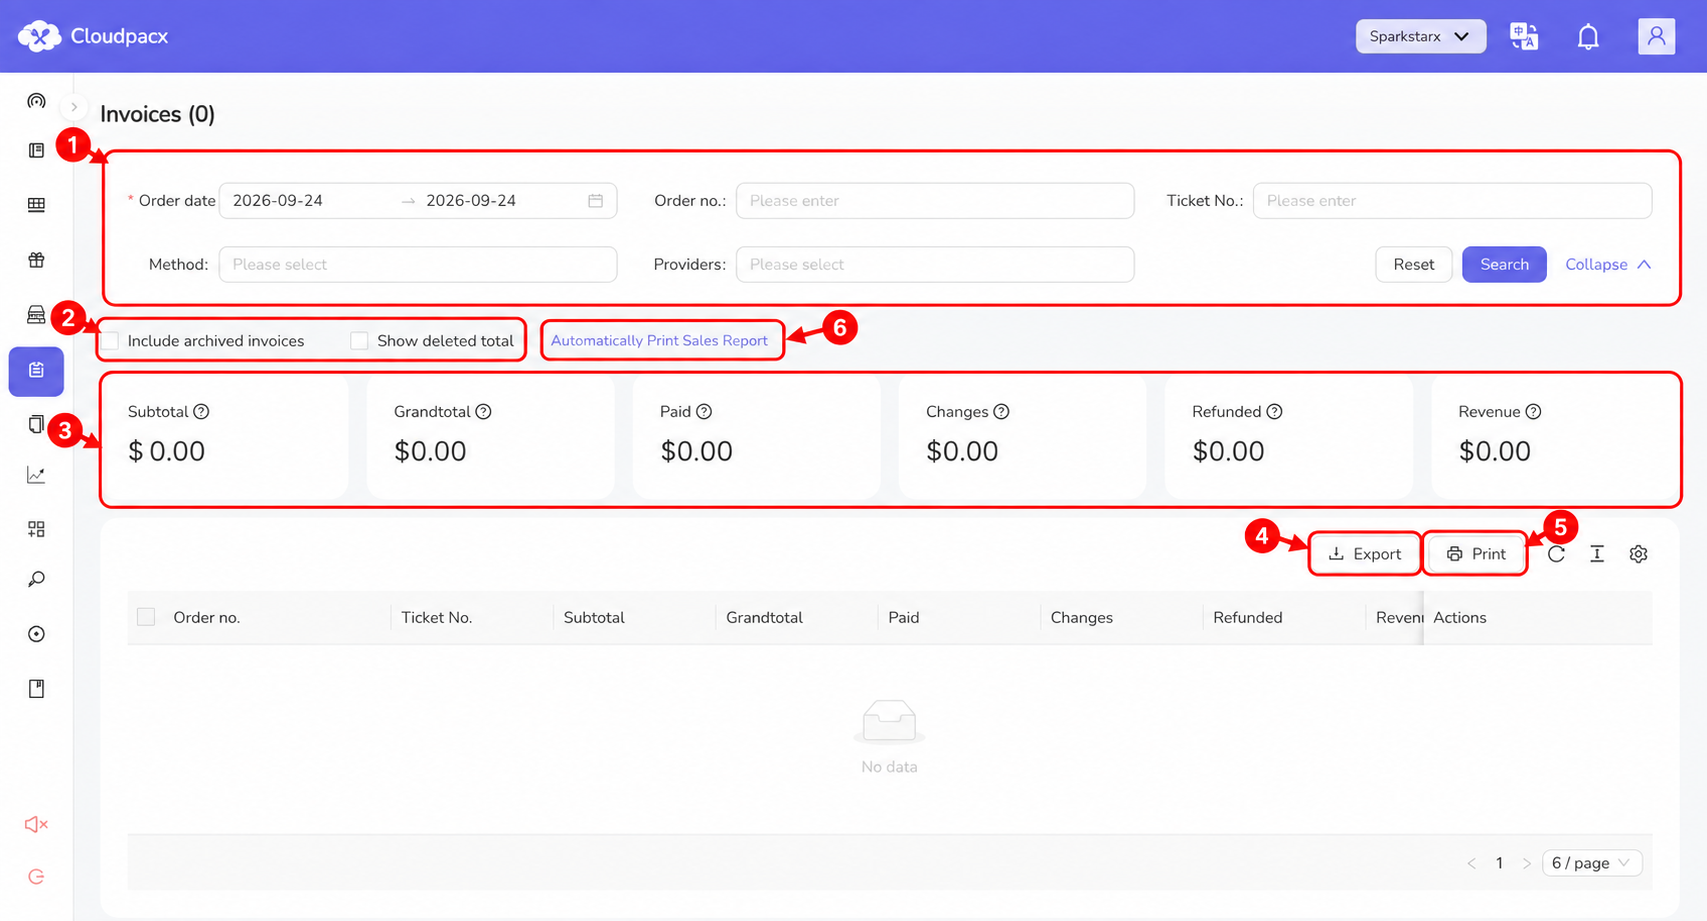
Read the six summary amounts
Open Invoices in the back office and check the business and Order date range. The question-mark icons beside the amounts explain how Cloudpacx defines each total.
| Field | Meaning |
|---|---|
| Subtotal | The total for all items, before the other adjustments represented in Grandtotal. |
| Grandtotal | The item total plus other adjustments, including coupons, discounts and extra tips. Discounts and coupons reduce the amount when applied as deductions. |
| Paid | The total payment amount recorded. It has not yet had Changes and Refunded deducted in the Revenue calculation. |
| Changes | Total change given back to customers, such as change from a cash payment. This does not mean edits to an invoice. |
| Refunded | The total refund amount. |
| Revenue | Paid − Changes − Refunded. This is the amount remaining after change and refunds; it is not a profit calculation. |
Items total $80.00. A $10.00 discount and $5.00 extra tip produce a Grandtotal of $75.00. The customer hands over $100.00 and receives $25.00 change. If $10.00 is later refunded, the figures are:
Subtotal $80.00 · Grandtotal $75.00 · Paid $100.00 · Changes $25.00 · Refunded $10.00 · Revenue $65.00.
Grandtotal describes the bill amount; Revenue follows the payment, change and refund calculation. They need not be equal.
Choose the invoice filters
| Filter | How to use it |
|---|---|
| Order date | Choose the start and end dates for the orders you want to review. This is a required field. |
| Order no. | Enter the order number when looking for a particular order. |
| Ticket No. | Enter the ticket number from the relevant ticket. |
| Method | Choose a payment method. The observed options are Card, Cash, WechatPay and Alipay. |
| Providers | Choose the provider or channel. The observed options are Offline, Stripe, Tyro, Square, Doordash, UberEats, Fantuan and HungryPanda. |
- Start with the date range, then add the order number, ticket number, method or provider needed for your task.
- Select Search to apply the form’s criteria.
- Review the invoice count and resulting records before exporting or printing.
- Use Reset to clear the form’s filters, then check the resulting date range and search again.
Example: to review cash payments for one day, select that day for both dates, choose Cash under Method and select Search. To look for card payments handled by Tyro, use Card under Method and Tyro under Providers with the appropriate dates.
Collapse folds the filter form away; it is not the Reset action. If results are unexpectedly empty, widen the date range and remove unnecessary criteria before searching again.
Review archived and deleted-record options
- Include archived invoices: include archived invoices when reviewing historical records.
- Show deleted total: show the total associated with deleted records. Use this deliberately when reviewing deleted-invoice amounts.
Record which options you used when comparing reports. A report reviewed with one selection should not be assumed to have the same scope as another reviewed with different selections. These controls do not restore archived or deleted invoices.
Export an invoice report
- Choose the intended date range and filters, then select Search.
- Review the invoice count, records and archived/deleted options.
- Select Export above the table and wait for report generation.
- When the generated file opens or downloads, save it using your browser’s normal file controls.
- Open the file and verify the included records and date range before sharing it or using it for reconciliation.
If the report file is blocked or fails to open, keep the selected date range and any displayed error for support. Report generation and successful file download are separate steps; clicking Export alone does not confirm that a usable file was saved.
Print a report
- Set the intended date range and filters, select Search, and review the results.
- Select Print above the invoice table to request the report.
- Wait for the request to finish, then check the output through your store’s configured printing workflow.
- Check the report’s date range and totals before using it for your shift or daily reconciliation.
If nothing appears, check the printing setup with your administrator before sending the same request repeatedly. Print is the manual action; scheduled reports are configured through the separate Automatically Print Sales Report link.
Configure automatic sales-report printing
- Select Automatically Print Sales Report above the totals.
- Review the Enable switch and turn it on if you want scheduled printing.
- Under Auto Print Sales Report At, select + Add.
- Use Select time to choose a printing time. Add another time if needed, or use Remove beside a time you no longer want.
- Review the schedule and select Confirm to save. Select Cancel to leave without saving.
Check the configured printer and confirm the expected report is produced at the scheduled time before relying on automatic printing for daily close.
Common questions
Why are all six amounts $0.00?
Check whether the page shows Invoices (0) and No data. Start with the selected business, date range and filters. An empty result for one search does not establish that the business has no sales in other periods.
Why is Paid higher than Revenue?
Check Changes and Refunded. Cloudpacx calculates Revenue as Paid minus those two amounts.
What should I send to support?
Include the screen name, selected date range, filters, archived/deleted options and exact error message. Contact [email protected].