
Find Welcome Information Modal
- In the back office, confirm the business selected at the top.
- Open Settings → Business → Client setting. The current interface spells the tab Clinet setting.
- Scroll to the bottom, below the Hide / Optional customer-detail settings.
- Find Welcome Information Modal. Existing entries are numbered, for example Welcome Information Modal 1.
Prepare the message you want customers to read, plus any language versions you need, before editing.
Add an entry or edit an existing message
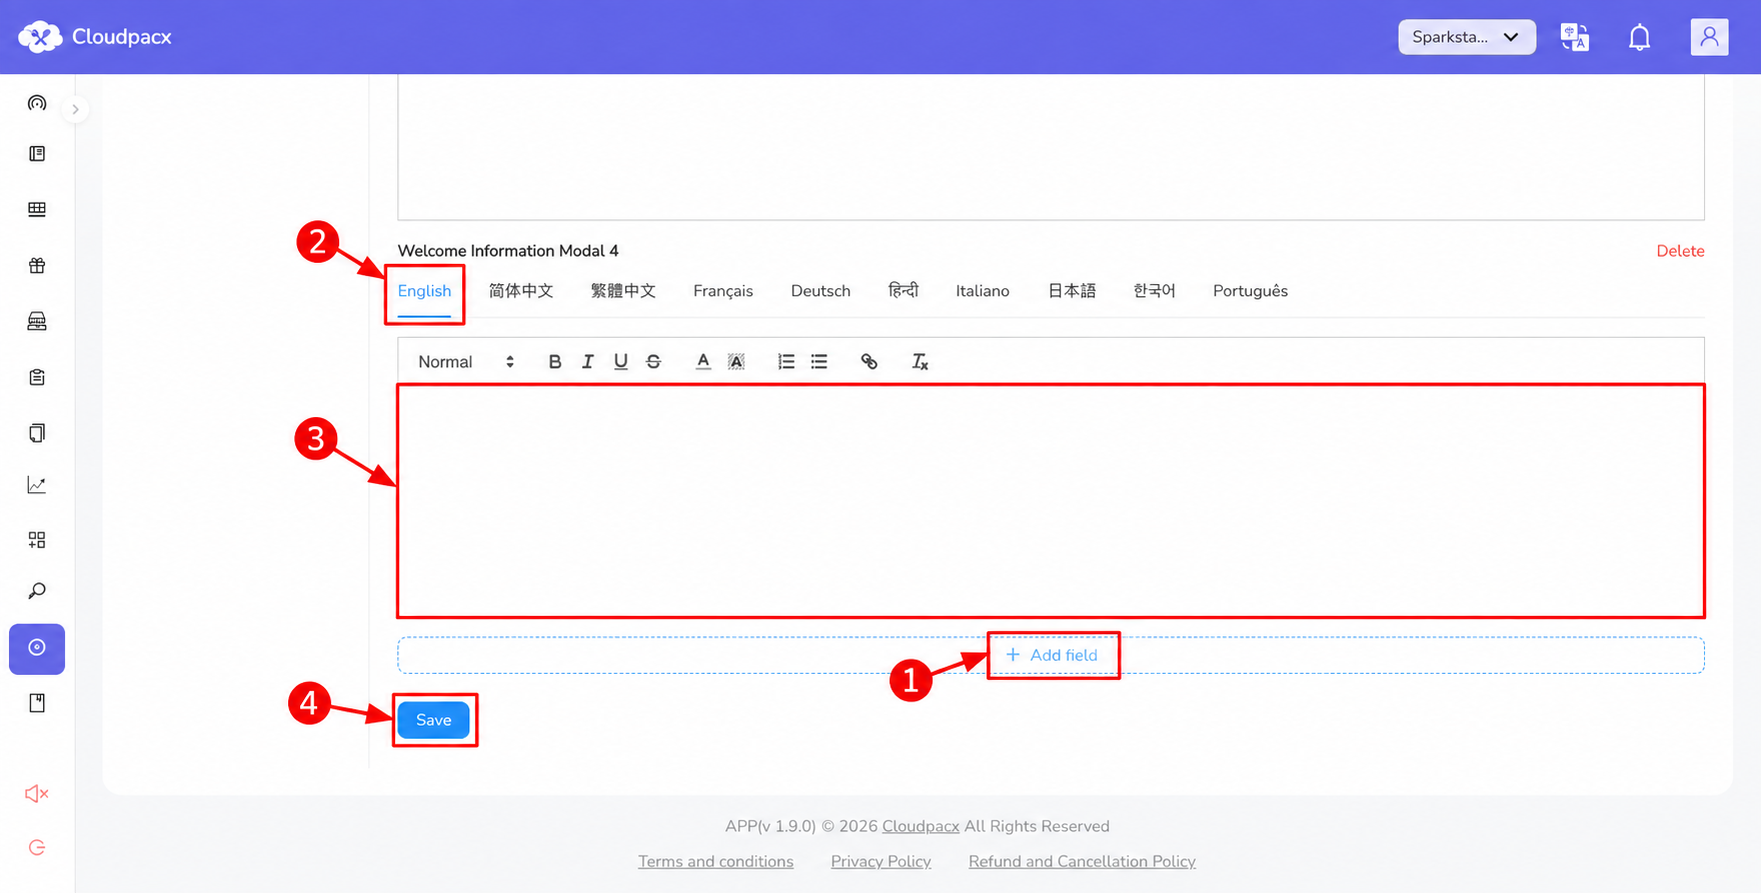
- To create another entry, select + Add field below the existing entries. A new numbered editor appears.
- To update an existing message, use that entry’s editor instead of adding a duplicate.
- Select the language tab you want to edit, such as English.
- Click inside the large text area below the formatting toolbar and enter your message.
Format the message for easy reading
Use the toolbar above the message to apply a heading, bold or italic text, a numbered or bulleted list, or a link. Keep the main instruction near the start and use short paragraphs so the message is easy to read on a phone.
Welcome! Browse our menu and choose your favourites.
If you have a food allergy, please speak with our team before ordering.
Replace the example with information that applies to your venue. If you add a link, review its destination and how its label reads within the message.
Enter the other language versions
- Within the same numbered entry, select another language tab, such as 简体中文 or 繁體中文.
- Enter the corresponding message in that language.
- Repeat for the languages you need, then revisit each edited tab to review the wording and formatting.
Use the language tabs for translated versions of one entry. Add field creates another numbered entry, rather than another language tab. Review each translation yourself instead of assuming that entering English fills the other tabs.
Save and check the client
- Review the content and language versions of every entry you changed.
- Select the blue Save button at the bottom of Client setting.
- Reopen the settings and confirm the entries and text were saved.
- Open the client for the same business and check the welcome message, formatting and relevant language versions.
To remove an unwanted entry, use Delete at the top-right of that numbered entry, then save. Check the entry number and text before deleting.
Common questions
Should I use Add field for a translation?
No. Choose a language tab inside the existing numbered entry. Add field creates an additional entry.
The message does not appear on the client
Confirm the correct business, saved message and client language first. Then reopen or refresh the client. If it still does not appear, contact support with the client URL and the affected language. Display timing and repeat-display behaviour are not configured by any of the controls shown in this editor.
Can I change the menu layout here too?
Yes. Client Menu Layout is near the top of the same settings page. Its Card and Sectioned choices are covered in the related guide below.